Creating and managing dashboard labels
This reference explains how to create and edit dashboard labels.
Introduction
Use dashboard labels to organize your dashboards. In the Dashboards page, create and edit dashboard labels, add these labels to your dashboards, and change the order in which dashboard labels are displayed.
Creating a dashboard label
To create a dashboard label, follow these steps:
-
Select the workspace you work with in Adverity and then, in the , click Dashboards.
-
In the , in the Label section, click
 Edit.
Edit. -
In the pop-up window that appears, click + Create label.
-
In the new Enter label name field that appears, enter a name for the new label.
-
Click Apply.
As a result, you have created a new dashboard label.
Editing a dashboard label
To rename a dashboard label or change the color of a dashboard label, follow these steps:
-
Select the workspace you work with in Adverity and then, in the , click Dashboards.
-
In the , in the Label section, click
Edit. -
To rename a dashboard label, click on the name of a label and change the name.
-
To change the color of a dashboard label, click on the colored dot to the left of a label to open the color picker. The image below shows how to complete this step.
-
In the color picker pop-up, choose a new color through one of the following options:
-
Enter the HEX color code of the new color.
-
Enter the red (R), green (G), and blue (B) values of the new color.
-
Enter the HSL values of the new color.
-
Select the new color in the color map.
-
Select one of the previewed colors.
-
-
Click Apply.
As a result, you have edited an existing dashboard label.
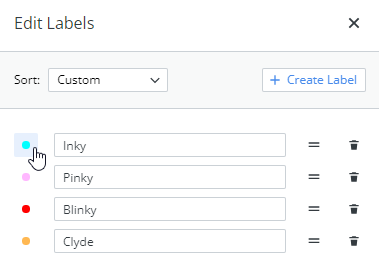
The location of the colored dot next to a label name. Click on the dot to open the color picker.
Adding and removing dashboard labels
To add and remove a dashboard label for a dashboard, follow these steps:
-
Select the workspace you work with in Adverity and then, in the , click Dashboards.
-
Hover the mouse over the dashboard to which you want to add the label and click
 Assign/Remove label.
 -
Select the dashboard label to add to the dashboard.
-
To remove a dashboard label from a dashboard, click on the label to deselect the label.
If you have added a label to a dashboard, a colored circle matching the color of the dashboard label appears on the dashboard tile. If you have removed a dashboard label, the matching colored circle no longer appears on the dashboard tile.
Changing the order of dashboard labels
You can change the order in which dashboard labels are displayed in the list that appears when you click ![]() Assign/Remove label. To change the order of the dashboard labels, follow these steps:
Assign/Remove label. To change the order of the dashboard labels, follow these steps:
-
Select the workspace you work with in Adverity and then, in the , click Dashboards.
-
In the , in the Label section, click
Edit. -
Use the
 Drag and drop labels icons to drag the dashboard labels into the order in which they will be displayed.
 -
Click Apply.
As a result, the dashboard labels will be displayed in your chosen order in the list that appears when adding and removing dashboard labels.