Advanced metric filter configuration
This guide explains advanced configurations for metric filters.
Introduction
Filter data in s and dashboards to display only the information that you find relevant.
This guide explains advanced metric filter configurations and how to create s with multiple metric filters. For information on how to create simple s with filters, see Creating widgets with filters.
Prerequisites
Before you complete the procedure in this guide, perform all of the following actions:
Combining metric filters
You can set up multiple metric filters. This section explains how metric filters are combined using two metric filters as an example.
By default, Adverity displays data in s if it satisfies the criteria of both filters at the same time. This combination of filter criteria relies on intersection (AND) logic. It narrows down the data that Adverity displays, and you see less data.
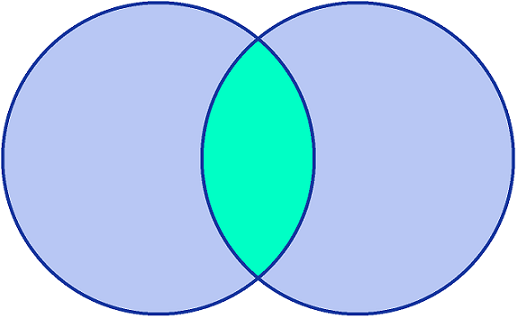
Intersection logic
To change how Adverity combines the criteria of the two metric filters, click OR in the right of the Widget filters section.
As a result, Adverity displays data in s if it satisfies the criteria of at least one of the two filters. This combination of filter criteria relies on union (OR) logic. It extends the data that Adverity displays, and you see more data.

Union logic
Applying a metric filter to raw data
A metric aggregates data from all available data extracts. By default, a metric filter applies to these aggregate values.
To apply a metric filter to the raw values, follow these steps:
-
Select the workspace you work with in Adverity and then, in the , click Data Explorer.
-
At the top of the page, select the View tab that contains the .
-
In the Widget filters section, click the metric filter to open its settings.
-
Select the On raw data checkbox.
-
Click Apply.
As a result, the s only display data from the data extracts which satisfy the filter criteria.