
Introduction to the Datastreams page#
The Datastreams page is where the process of collecting your data in Adverity begins. Here, you can create a datastream to collect raw data from your data source.
A datastream is how you collect data from a data source in Adverity. You can create multiple datastreams for the same data source, for example to collect data from different accounts in separate datastreams.
The datastream configuration defines the following settings, among others:
The data that Adverity collects
The time period for which Adverity collects data
How often Adverity collects data using this datastream
After you have created at least one datastream, the Datastreams page provides an overview of your datastreams.
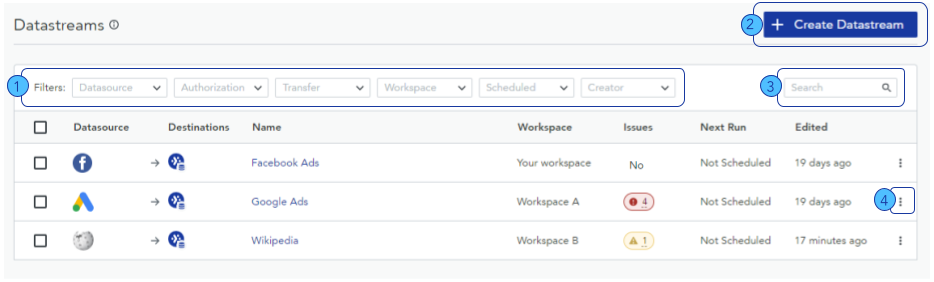
Use the filters to view your datastreams according to different properties. See below for more information about these filters.
Enter a datastream name in the search field to find it by Name.
Click + Create datastream to create a new datastream.
Select the checkboxes next to one or more datastreams to show additional actions in the table header. The actions available depend on your role and permissions. For more information, see Managing user permissions.
The table in the middle of the Datastreams page contains important information about your datastream s in the following columns:
Datasource - the data source from which this datastream collects data
Destinations - the destinations which have been assigned to this datastream
Name - the name of this datastream
Workspace - the workspace in which this datastream was created
Issues - errors and warnings relating to this datastream are shown here. Open the datastream overview and click the Failed or Warnings tab for more information.
Last run - the last time this datastream fetched data
Next run - the next time this datastream will fetch data if you have scheduled a fetch for this datastream. For a datastream using Smart Schedule, this column shows an estimate, such as in ≥3 hours or Due now, rather than an exact time. Hold the pointer over the estimate to see the full schedule, including the configured Earliest fetch start and Load the data by times.
Edited - the last time this datastream was edited
The filters above the table allow you to view specific datastream s in the table. You can apply more than one filter at the same time to view specific datastream s:
Datasource - displays all datastreams that collect data from the selected data source
Authorization - displays all datastreams that use the selected authorization
Transfer - Yes displays all datastreams that have loading into Data Warehouse or a destination enabled, and No displays all datastreams that do not
Workspace - displays all datastreams that were created in the selected workspace
Scheduled - Yes displays all datastreams that are scheduled to fetch data, and No displays all datastreams that are not scheduled to fetch data
Creator - displays all datastreams created by the selected user
Destinations - displays all datastreams that have the selected destination assigned
You can also use the search bar to search for datastream s by the Name column in the table. You can use the search function with or without filters applied.
Click  Select an action in a specific datastream ‘s row
in the table to perform additional actions with this datastream .
The actions you can perform are:
Select an action in a specific datastream ‘s row
in the table to perform additional actions with this datastream .
The actions you can perform are:
Fetch - start a manual fetch for this datastream
Schedule fetches - configure schedules for this datastream
Add destination - assign a destination to this datastream
Enable destination - allow data to be loaded from this datastream into its assigned destinations
Disable destination - prevent data from being loaded from this datastream into its assigned destinations
Acknowledge issue - for more information, see the Using the Activity page
Clone - clone this datastream
Rename - rename this datastream
Delete - delete this datastream. For more information, see Deleting datastreams