Filtering the data shown in widgets#
This guide explains how to add and configure date range filters, dimension filters, and metric filters for individual widgets, and how to save dimension and metric filters as a filter template.
Introduction#
- What types of filter can I apply to widgets?
There are three types of widget filter:
Date range filters only display data in a widget if the data comes from the date range you specify.
Dimension filters only display data in a widget if the dimension values meet the criteria you specify.
Metric filters only display data in a widget if the metric values meet the criteria you specify.
- Can I filter the data in multiple widgets on a dashboard?
You can filter the data shown in widgets and dashboards using two types of filter:
Widget filters filter the data displayed in individual widgets. You can save a set of dimension and/or metric filters as a filter template to apply the same filters to another widget. This procedure is explained in this guide.
Dashboard filters filter the data displayed on entire dashboards and dashboard pages. For more information, see Adding filters to a dashboard.
Prerequisites#
Before you complete the procedure in this guide, perform all of the following actions:
Adding a date range filter to a widget#
Use date range filters to filter the data displayed in the widgets by the date range of the data.
Note
Week-related dimensions and date range filters are based on the first day of the week set in your workspace.
To change the first day of the week on a workspace level, contact Adverity support.
Go to the Explore page.
At the top of the page, select the View tab that contains the widget.
In the Date Range section, click the drop-down menu on the left.
In the drop-down list, select one of the following options. If necessary, in the date picker or drop-down menu, select any additional options:
Note
Date range options that depend on the current date are adjusted based on Central European Time (CET) and Central European Summer Time (CEST). When a date range refers to the “current date”, this refers to the date on which the widget is viewed, not the date on which it was created.
Select Fixed, then select a date range to only show data for a fixed date range that does not depend on the current date.
To only show data for the current date, select the current date as the start and end of the date range.
Select Moving end, then select a start date to only show data from the start date to the current date.
This option cannot show future data, such as planned values.
Select Open end, then select a start date to only show data from the start date to the last date for which data is available.
This option can show future data, such as planned values.
Select one of Last x days/weeks/months/quarters/years, then select a number to only show data for that many of the last days/weeks/months/quarters/years before the current date.
For example, to only show data for the last two weeks, select Last x weeks and select 2.
Select one of Next week/month/quarter/year to only show data from the first to last day of the next week/month/quarter/year after the current week/month/quarter/year, if this data is available.
Select one of This week/month/quarter/year to only show data from the first day of the current week/month/quarter/year to the current date.
(Optional) After selecting this option, select the Limit until yesterday checkbox on the right to exclude data from the day before the current date.
Select one of Last week/month/quarter/year to only show data from the first to last day of the week/month/quarter/year before the current week/month/quarter/year.
Select All time to show all available data in the widget.
Click anywhere to apply the date range filter.
As a result, the data in the widget is filtered according to the date range you selected.
Adding a dimension filter to a widget#
Use dimension filters to filter the data displayed in the widget by the value of a dimension.
You can add one or more dimension filters to a widget. The logic used to combine the filters depends on how you create them. For more information, see Combining dimension filters.
To add a dimension filter to a widget, follow these steps:
Go to the Explore page.
At the top of the page, select the View tab that contains the widget.
In the Widget filters section above the data table, click
Add dimension filter.
(Optional) Deselect the Use date range checkbox to filter data based on dimension values for all time.
In the Choose dimension drop-down menu, select the dimension by which you want to filter data.
In the Filter by drop-down menu, select the dimension values for which you want to filter. By default, the filter uses the is criteria, and will show dimension values that exactly match the value you select.
Click each value to change the criteria for the selected value:
is - only show dimension values that exactly match this value
contains - only show dimension values that contain this value
startsWith - only show dimension values that start with this value
endsWith - only show dimension values that end with this value
(Optional) Select the Exclude checkbox to exclude data matching the filter, i.e. if you want to filter for all values except the values selected in the previous step.
(Optional) To add another dimension filter, click Add filter and repeat steps 5-7 above. The filters are applied in the order you choose in this dialog box. Use the arrow icons above each filter to change the order of the filters. For more information, see Combining filters.
Click Apply.
As a result, the configured dimension filter is applied to the widget. Only data that meets the criteria of the dimension filter will be displayed in the widget.
Adding a metric filter to a widget#
Use metric filters to filter the data displayed in the widget by the value of a metric. To add a metric filter to a widget, follow these steps:
Go to the Explore page.
At the top of the page, select the View tab that contains the widget.
In the Widget filters section above the data table, click
Add metric filter.
In the Choose metric drop-down menu, select the metric by which you want to filter data.
Configure the filter condition from the following options:
Range - enter values in the From and To fields to only show data if the metric value is within this range.
At least - enter a value in the From field to only show data if the metric value is greater than or equal to the value.
At most - enter a value in the To field to only show data if the metric value is less than or equal to the value.
Special - choose Not Null values to only show data if the metric value is not NULL, or choose Null values to only show data if the metric value is NULL.
(Optional) Select the On raw data checkbox to apply the filter to the raw values for the metric.
Note
A metric aggregates data from all available data extracts. By default, a metric filter applies to these aggregate values. Selecting this checkbox applies the filter to the raw values.
Click Apply.
(Optional) To add another metric filter to the widget, click
Widget filter and repeat steps 4-7 above. For more information about combining metric filters, see Combining filters.
As a result, the configured metric filter is applied to the widget. Only data that meets the criteria of the metric filter will be displayed in the widget.
Filter templates#
Filter templates allow you to save a set of dimension filters for a widget and apply them to other widgets.
This guide explains how to save and apply filter templates in the Explore page.
You can also save filter templates and apply filter templates to widgets in the Present page. For more information on working with filter templates in Present, and how to view your filter templates, see Creating and viewing filter templates.
Saving filters as a template#
To save the filters you have currently applied to a widget as a filter template, follow these steps:
In the Save as filter template dialog box, enter a name for the filter template.
Click Apply.
As a result, the current filters have been saved as a filter template. You can now apply these filters to another widget by applying the filter template.
Applying a filter template to a widget#
Warning
Applying a filter template to a widget removes any dimension and/or metric filters you have already added to the widget.
To load a filter template and apply it to another widget, follow these steps:
Open the widget to which you want to apply the filter template.
In the Load filter template dialog box, select the filter template to apply.
Click Apply.
As a result, the selected filter template is applied to the widget.
Combining filters#
When you filter the data in a widget by more than one dimension or more than one metric, you can choose the logic Adverity uses to combine the filters. Adverity either uses AND or OR logic to combine filters. These logic types are explained below.
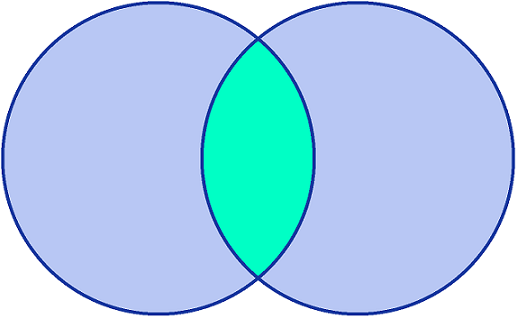
AND logic means that data will be displayed in the widget if it satisfies the criteria of all filters at the same time. It narrows down the data that Adverity displays, and you see less data. The diagram below shows two filters applied (blue) and the resulting data that is shown (green).

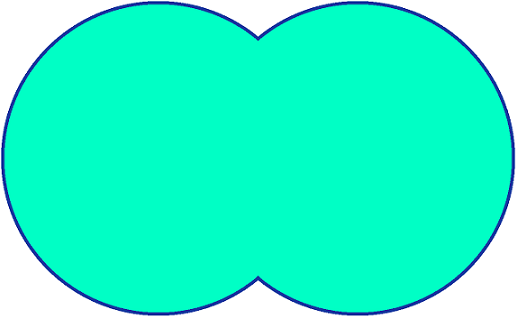
OR logic means that data will be displayed in the widget if it satisfies the criteria of at least one of the applied filters. It extends the data that Adverity displays, and you see more data. The diagram below shows two filters applied (blue), and the resulting data that is shown (green).

Combining dimension filters#
The logic that Adverity uses to combine dimension filters depends on how you create the filters:
To combine dimension filters using AND logic, use the Add filter option in the Dimension filter dialog box to filter by more than one dimension in a single dimension filter.
To combine dimension filters using OR logic, create one dimension filter, then click
Add dimension filter again to create a second filter.
Combining metric filters#
To choose the logic that Adverity uses to combine metric filters, follow these steps:
Follow the steps in Adding a metric filter to a widget more than once so you have created more than one metric filter.
On the right-hand side of the Widget filters section, select AND or OR.
As a result, the logic type you select is used to combine the metric filters.