Introduction to the Present page#
The Present page is where you can create and manage dashboards.
A dashboard is a collection of widgets organized to present your data. You can share a dashboard to collaborate on it with other Adverity users, and to allow external users to view it.
After you have created at least one dashboard, the Present page provides an overview of your dashboards. To decide which metrics to highlight and how to calculate them in Adverity, review Marketing KPI best practices before you configure widgets.

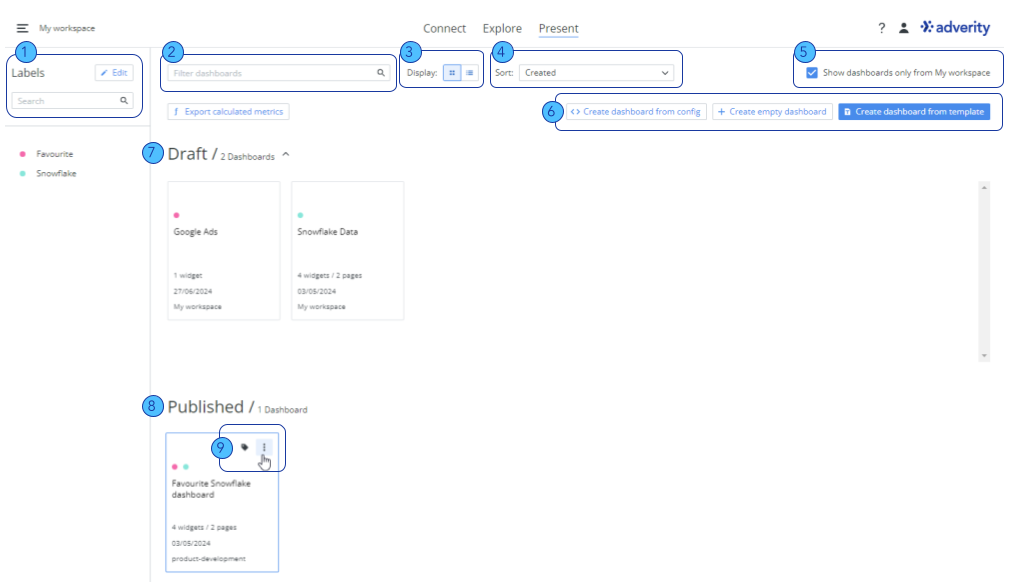
Use the Labels filter to view your dashboards according to their labels. For more information about dashboard labels, see Creating and managing dashboard labels.
Type here to filter your dashboards by the dashboard name.
Use these options to change the dashboard display from a grid (pictured above) to a table (pictured below).
Select an option from this drop-down menu to sort your dashboards in order by name, the date on which they were created, the date on which they were most recently updated, their status, the user who created them, or the workspace where they are located.
Select this checkbox to only show dashboards in your current workspace. Deselect this checkbox to additionally show dashboards in child workspaces.
Use these options to create new dashboards in different ways. For more information about creating dashboards, see Creating dashboards in Present.
This section shows your draft dashboards. Draft dashboards can only be seen by the user who created them and the users with Administrator permissions.
In this image, the colored dots on the dashboards represent the labels assigned to these dashboards. Click the
and
icons next to the section heading to show and hide your draft dashboards.
This section shows your published dashboards. Published dashboards can be viewed by anyone with access to the workspace in which they are published.
Hover over a dashboard to see the
Add/remove labels and
Show additional info options.
Click
Show additional info to view more information about the selected dashboard, and to access the
Change dashboard name,
Clone dashboard and
Delete dashboard options.
For more information about cloning a dashboard, see Cloning dashboards and dashboard pages.

The image above shows the Present page if you change the Display setting from a grid to a table. The following areas of the Present page are different when your dashboards are shown in a table:
Use these filters to view all dashboards, only draft dashboards, or only published dashboards.
Click these icons to perform the following additional actions with the selected dashboard:
Dashboard information - view additional information about this dashboard
Add/remove labels - assign or remove a label on this dashboard
Clone dashboard - create an exact copy of this dashboard. For more information about cloning a dashboard, see Cloning dashboards and dashboard pages.