Using role-based filters in Dashboards#
This guide explains how to create role-based filters in Dashboards, apply them to roles and view the role-based filters applied to your role.
Introduction#
Use role-based filters to manage users’ data access rights in Dashboards in a scalable manner. Role-based filters allow users with Workspace Admin permissions to filter the data that users can see, depending on the role these users have.
Role-based filters are dimension filters. As a result, users with a role to which a role-based filter is assigned will only be able to see values for specific dimensions.
You can create and apply role-based filters in two ways:
Create a new role with a role-based filter
Apply a role-based filter to an existing role
Prerequisites#
Role-based filters are disabled by default in Adverity. To enable this feature, contact your Account Manager.
In order to add a role-based filter to a role, you must have Workspace Admin (WA) permissions included in your role. To see the permissions you have, follow these steps:
Go to the Explore page.
In the top left corner, click
 Select workspace, then
 Administration.
In the Users & roles section of the administration menu, click Users.
Find your user account in the table and click Show in the row containing your user account details.
At the bottom of the page, you will see a table that shows the roles and permissions you have in Dashboards. If there is a check in the column for the Workspace Admin (WA) permissions, you will be able to create and apply role-based filters.
For more information on roles and permissions, see Managing user permissions in Dashboards.
Creating a new role with a role-based filter#
To create a new role with a role-based filter applied, follow these steps:
Go to the Explore page.
In the top left corner, click
Select workspace, then
Administration.In the Users & roles section of the administration menu, click Roles.
In the top right corner of the page, click + Add role to current workspace.
In Role Name, enter a name for the new role.
In the list, select the permissions to include in this new role. For more information on user permissions, see Managing user permissions in Dashboards.
In the Dimension filter section, click
 Add dimension
filter to create a new dimension filter for the role. To add a
new dimension filter, follow these steps as shown in the image below:
Add dimension
filter to create a new dimension filter for the role. To add a
new dimension filter, follow these steps as shown in the image below:In Choose dimension, select the dimension to use in the filter.
In Filter by, select the dimension values that the users assigned to this role can see. To select all the values for the selected dimension, click Select All.
(Optional) To add another dimension filter, click + Add Filter.
(Optional) To hide the selected dimension value from the user, select the Exclude checkbox.
Click Apply.
(Optional) To save the role-based filter as a filter template, click
 Save as filter template, enter a name for the filter
template, and click Apply.
Save as filter template, enter a name for the filter
template, and click Apply.(Optional) To load a role-based filter from a filter template, click
 Load filter template, select the filter template to use,
and click Apply.
Load filter template, select the filter template to use,
and click Apply.Click Create.
As a result, you have created a role with a role-based filter applied to it.
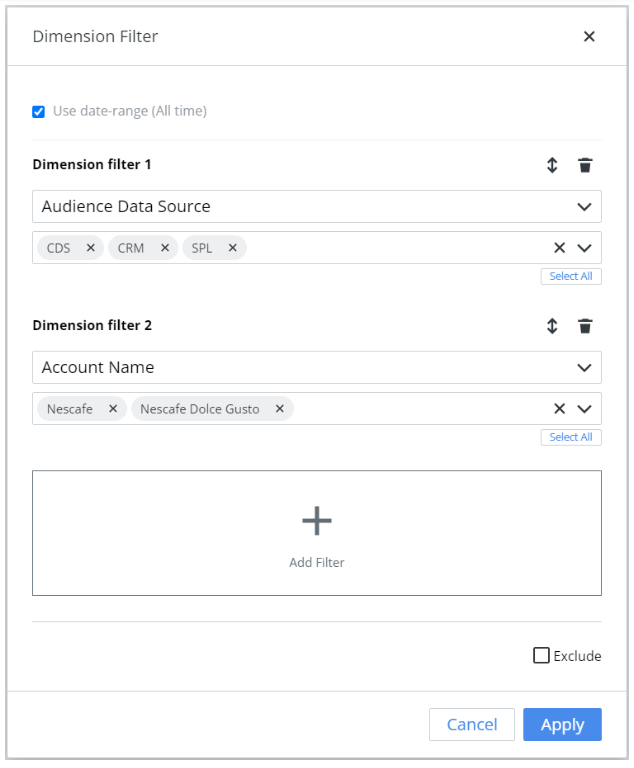
The Dimension Filter window used to add a role-based filter to a role
Adding a role-based filter to an existing role#
To add a role-based filter to an existing role, follow these steps:
Go to the Administration page.
In the secondary menu, click Roles.
In the table, find the role to which you want to apply the role-based filter and click Show.
In the Dimension filter section, click
Add dimension
filter to create a new dimension filter for the role.To add a new dimension filter, follow these steps as shown in the image above:
In Choose dimension, select the dimension to use in the filter.
In Filter by, select the dimension values that the users assigned to this role can see. To select all the values for the selected dimension, click Select All.
(Optional) To add another dimension filter, click + Add Filter.
(Optional) To hide the selected dimension value from the user, select the Exclude checkbox.
Click Apply.
(Optional) To save the role-based filter as a filter template, click
Save as filter template, enter a name for the filter
template, and click Apply.(Optional) To load a role-based filter from a filter template, click
Load filter template, select the filter template to
use, and click Apply.Click Update.
As a result, you have added a role-based filter to an existing role.
Seeing the role-based filters applied to your role#
Role-based filters are applied everywhere you can see data. This includes the views in the Explore page and your dashboards in the Present page. You can see the role-based filters that are applied to your role in the following places:
In the Explore page, look at the Role Filters section of a view to see which role-based filters have been applied to your role. The image below shows what a view looks like when a role-based filter is applied to your role.
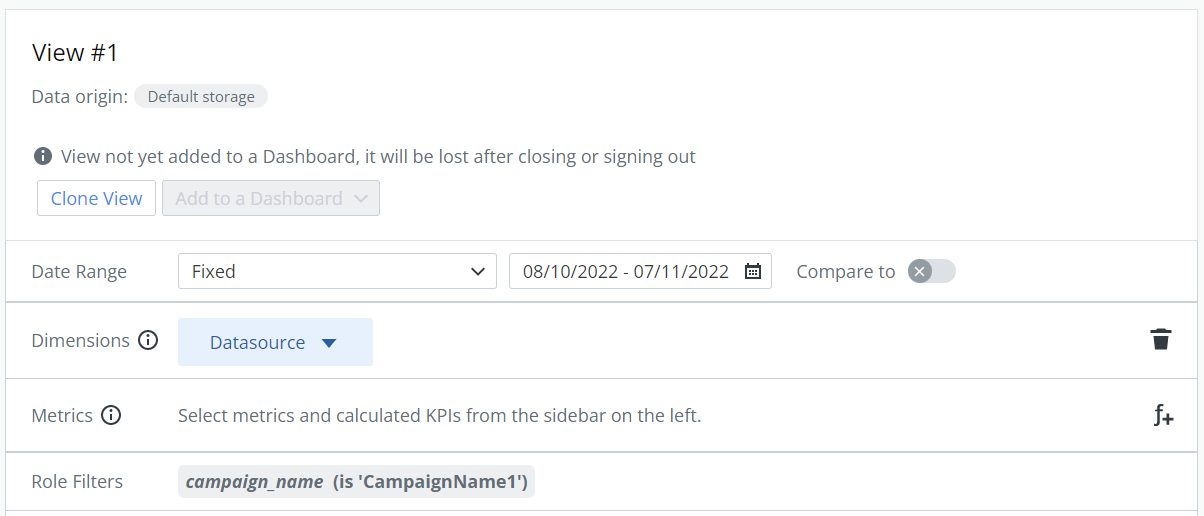
Any role-based filters that are applied to your role appear in the Role Filters section of the view.
When viewing a dashboard in the Present page, click on the
 Role-based filter icon to see the role-based filters
that are applied to your role. The image below shows what you will see
if a role-based filter is applied to your role.
Role-based filter icon to see the role-based filters
that are applied to your role. The image below shows what you will see
if a role-based filter is applied to your role.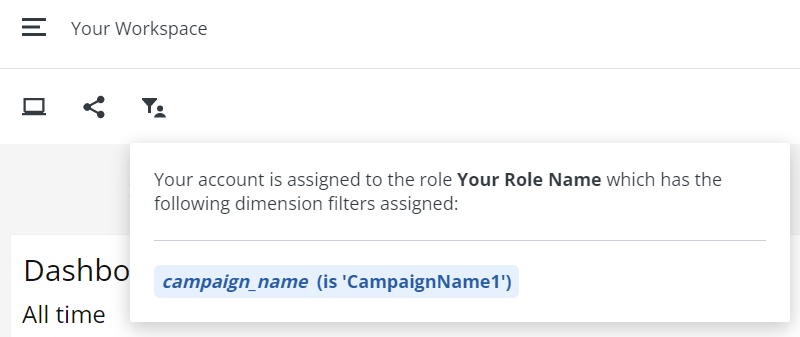
Any role-based filters that are applied to your role appear when you click the Role-based filter icon when viewing a dashboard