
Introduction to the Authorizations page#
Introduction#
The Authorizations page is where you manage the authorizations that allow you to collect data from your chosen data sources.
- What is an authorization?
An authorization gives Adverity access to a data source or a destination. You need to create an authorization to collect data and load it into external destinations. You can use one authorization to create multiple datastreams and destinations.
- What are authorization permissions?
Most authorizations give Adverity access to multiple items that are linked to the authorization, such as accounts or profiles. When you create an authorization, you set permissions that define which items Adverity can access.
If an authorization does not ask you to select the permissions for items you want to give Adverity access to, this means that the authorization only grants Adverity access to a single item, for example a single account.
Permission changes#
This section, available as part of the Data Quality Suite, provides an overview of the permission changes across your authorizations.
The visualization shows a bar chart representing permissions added or removed, with added and removed permissions shown as separate bars. The chart covers up to a month in the past. Hover over a bar to see the count of additions and removals for that day, along with the connector name. Click See more to open the Permission Changes page, where you can select a date range, filter and search the full history of permission changes across all authorizations, and export the results as a CSV file.
For more information, see Monitoring permission changes.
Authorizations overview#
After you have created at least one authorization, the Authorizations page provides an overview of your authorizations.
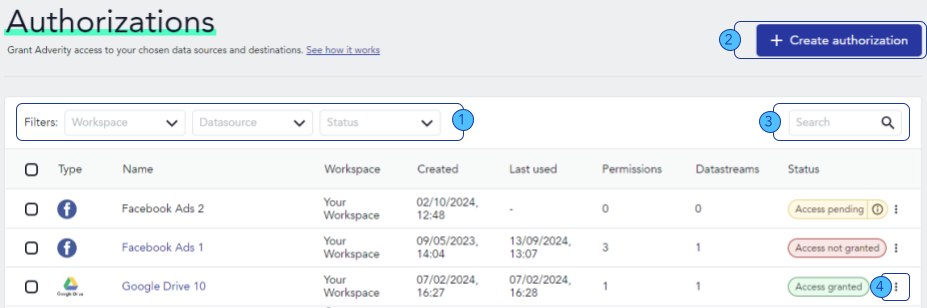
Use the filters to view your authorizations according to different properties. See below for more information about these filters.
Enter an authorization name in the search field to find it by Name.
Click + Create authorization to create an authorization.
Select the checkboxes next to one or more authorizations to show additional actions above the table, including cloning to another workspace. The actions available depend on your role and permissions. For more information, see Managing user permissions and Cloning authorizations.
The table in the middle of the Authorizations page contains important information about your authorization s in the following columns:
Type - the data source to which this authorization applies
Name - the name of this authorization
Workspace - the workspace in which this authorization was created
Created - the date and time at which this authorization was created
Last used - the date and time at which this authorization was most recently used
Permissions - the number of items this authorization has permissions for
Used by - the number of datastreams and the number of destinations that use this authorization, shown separately
Status - the authorization’s access status
The filters above the table allow you to view specific authorization s in the table. You can apply more than one filter at the same time to view specific authorization s:
All / System managed - System managed displays only authorizations that Adverity manages automatically
All / Data sources / Destinations - displays authorizations by whether they apply to data sources or destinations
All / In use / Not in use - displays authorizations by whether they are currently used by a datastream or destination
Workspace - displays all authorizations that are used in the selected workspace
Connection type - displays all authorizations for the selected data source or destination
Creator - displays all authorizations created by the selected user
Status - displays all authorizations with the selected access status
You can also use the search bar to search for authorizations by the Name column in the table. You can use the search function with or without filters applied.
Click  Select an action in a specific authorization‘s
row in the table to perform additional actions with this
authorization . The actions you can perform are:
Select an action in a specific authorization‘s
row in the table to perform additional actions with this
authorization . The actions you can perform are:
Sync metadata - manually update metadata - for more information, see Synchronizing metadata
Validate authorization - verify that the authorization is valid
Rename - rename the authorization
Available permissions - export a CSV file containing a list of the permissions assigned to this authorization
Permission changes - export a CSV file containing permission changes for this authorization in the selected date range. For more information, see Monitoring permission changes.
Clone - clone the authorization
Delete - review the list of objects that will be affected if you delete this authorization, and delete this authorization
These actions can also be performed in bulk. To perform an action on multiple authorizations at the same time, follow these steps:
Select the authorizations you want to perform an action on.
Above the table the actions menu will appear. Select the action you want to apply.