Loading data into Data Warehouse#
This guide explains how to load data into Data Warehouse to use it in Adverity and Dashboards.
Note
If you want to use data in Dashboards:
Use this guide if you see a link to Dashboards in the platform navigation menu and use warehouses in Adverity.
If you see separate links to Explore and Present in the platform navigation menu and you do not use internal warehouses in Adverity, see Loading data into Dashboards.
Introduction#
In Adverity, Data Warehouse is an internal destination for your data so that it can be used in other Adverity products. You need to load data into Data Warehouse in order to:
Send data to some external destinations. This is noted in the destination guides where relevant.
By default, Adverity manages the storage for Data Warehouse. You can also connect your own external warehouse. For more information, see Connecting an external data warehouse.
This video guide explains how to load your data into Data Warehouse.
Prerequisites#
Before you complete the procedure in this guide, perform all of the following actions:
Fetch data using this datastream.
Apply the correct Data Mapping to your datastream.
Note
Make sure that all dimensions and metrics you want to load into Data Warehouse and use in Adverity are mapped.
If using an external warehouse, connect the warehouse.
Loading data into Data Warehouse#
To load data from a datastream into Data Warehouse for the first time, follow these steps:
Go to the Datastreams page.
Click the datastream that contains the data you want to use in Adverity.
Configure the data loading settings for the connected warehouse.
In the Load section of the datastream overview, enable the toggle next to the connected warehouse.
As a result, the data you have already fetched in this datastream will be loaded into the connected warehouse. From now on, the settings you selected in this process will be used every time you fetch new data and load it from this datastream into the connected warehouse.
Configuring loading settings for the warehouse#
To change how you load data into the connected warehouse, follow these steps:
Go to the Datastreams page.
Click the datastream that contains the data you want to use in Adverity.
In the Load section of the datastream overview, next to the warehouse toggle, click
 Actions, then
  Settings.
In the dialog box that opens, select whether the datastream contains time-series data. Adverity will recommend settings based on this selection.
Note
Time-series data means any data that is linked to a specific date or time, e.g., the number of clicks on a specific day. Time-series data contains a date column, which is used to overwrite data for existing dates and times in the connected warehouse.
If you selected Yes, this datastream contains time-series data, select the date column you want to use when loading data into the connected warehouse.
Warning
The values in the date column must be in
YYYY-MM-DDformat. Adverity will not recognize other date formats, and they will not appear in the drop-down menu.If your data contains dates in a different format, use the convertdates transformation before loading the data.
Select how you want to load new data from this datastream into the connected warehouse. For detailed explanations of the available options, see Understanding warehouse data storage options.
Overwrite specific days (recommended for time-series data)
Append all new rows
Overwrite all rows (recommended for non-time-series data)
In the Advanced options section, select the Overwrite Key Columns checkbox to overwrite data in the connected warehouse based on the key columns defined in the datastream’s Data Mapping.
In the Dashboards section, configure the following settings if you want to use your data in Dashboards:
- Workspace mapping type
Select to which workspaces in Dashboards to load data. Depending on the selected option, different additional settings are available.
Select 1 to 1 mapping to use data in a single workspace in Dashboards. For more information on additional settings, see Loading data to use in a single Dashboards workspace.
Select 1 to many mapping to use data in multiple workspaces in Dashboards. For more information on additional settings, see Loading data to use in multiple Dashboards workspaces.
Select None to use an advanced approach to workspace mapping, configuring it through transformations. For more information and examples, see Using advanced workspace mapping.
- Customize Datasource Label
(Optional) Enter a custom name for this datastream to be used in the Datasource dimension in Dashboards or leave it empty to use the default data source name.
Save your settings by clicking one of the following:
Save & re-load — saves your settings and re-loads the data extracts already collected in this datastream so that they reflect the updated settings.
Save without re-load — saves your settings for future loads only, without re-loading the data extracts already collected. Use this when you want to change the loading configuration but do not want to trigger a re-load of existing data.
To discard your changes instead, click Cancel.
Note
Both save options stay disabled until you have selected whether the datastream contains time-series data and chosen how to load new data.
Enable the toggle for the connected warehouse.
In the Load data? pop-up window, click Yes, load data if you want to load your previously collected data into the connected warehouse. The following data extracts will be loaded:
All data extracts with the status collected if no other destinations are enabled for the datastream
All data extracts with the status loaded if the data extracts have already been sent to the connected warehouse or external destinations
Alternatively, click Skip to reload the data extracts manually. For more information, see Re-loading a data extract.
Understanding warehouse data storage options#
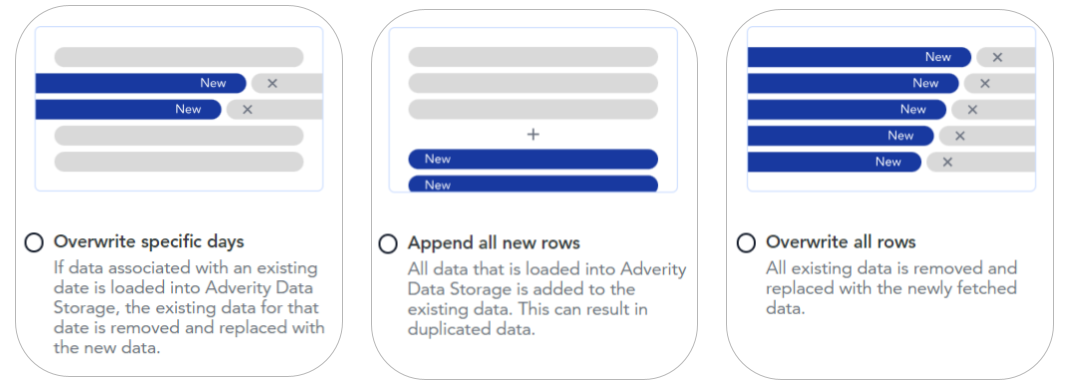
There are three options to choose from when you decide how to load your data into the connected warehouse. These are explained in the list and illustration below.
- Overwrite specific days
If data for a specific date already exists in the connected warehouse and you load new data for this date into the connected warehouse, the existing data for this date is replaced with the new data. Any other existing data stays the same.
This is recommended for time-series data because you will not have more than one row of data for each date. For example, if you collect data about the number of clicks per day on an advert, this option will result in one row of the most recent data for each day in your stored data.
- Append all new rows
All rows of data in your new data extract are added to the existing rows of data in the connected warehouse. No existing data is overwritten or deleted.
- Overwrite all rows
All existing rows of data in the connected warehouse are deleted, and replaced with your new data extract.
This is recommended for non-time-series data because it avoids the possibility of loading duplicate data into the warehouse.
Deleting data from the connected warehouse#
Stored data is removed from the connected warehouse in the following cases:
- Overwriting previously stored data
To replace previously stored data when loading new data into the connected warehouse, select an appropriate setting.
For more information, see Understanding warehouse data storage options.
- Deleting a datastream
Stored data is deleted from the connected warehouse when you delete the datastream from which the data was loaded.
For more information, see Deleting datastreams.